- Making the Most of a 32 x 40 Sheet
- Trimming Mat Board to Size
- Trimming Mat Board to Size with Straight Edge
- Trimming Mat Board to Size with Compact
- Trimming Mat Board to Size with Simplex
- Mat Cutting
- Cutting Single Mat Using a Straight Edge
- Cutting a Single Mat With a Simplex-Basics
- Cutting a single mat with a simplex-detailed
- Cutting a double mat
- Cutting a double mat- detailed professional version
- The professional framers secret for cutting a double mat
- How to measure and cut a double mat,
- Cutting a stepped corner mat – basics
- Cutting stepped corner mats – detailed
- Offset (stepped) corner mat
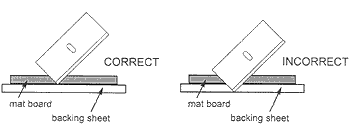
- Slip sheets
- The importance of using a slip sheet when cutting
- The importance of using a backing sheet
- Why am I getting a ragged cut?
- How to avoid rough or ragged edges when cutting mats
- Dealing with inconsistencies in the bevel edges
- Adjusting your mat cutter for proper blade depth
- The importance of proper blade depth
- Why am I getting a hook in the corners or curve in the bevel cut?
- How come I don't cut all the way through the mat board?
- How to conquer overcuts and undercuts?
- Dealing with overcuts and undercuts
- Why am I getting overcuts in the corners?
- Why are my mats not coming out square?
- Why is my bevel cut going the wrong way?
- How to cut left handed
- How to cut a 40" sheet of mat board on the 32" compact mat cutter
- Is using production stops the fool proof way to get perfect mats?
- Tips for working with production stops on your mat cutter
- Basic mat cutter maintenance
- Mounting your artwork
- Grappling with conservation and archival mounting concerns
- Supporting Artwork
- Hinge mounting T, V and S methods
- A simple method to a T-hinge mount
- Trapping methods
- Permanent mounting
- Wet mounting
- Pressure sensitive adhesive mounting
- How to mount artwork using positionable mounting adhesive (PMA)
- Spray adhesives
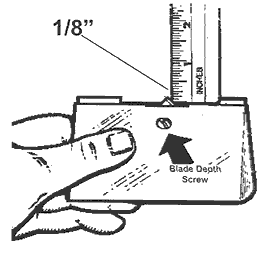
1. Hold the bevel cutter upside down in your hand with the blade activated in the cutting position.
2. Looking at the tip of the blade, measure the exposed amount with a ruler at the same angle as the blade. For standard thickness mat board (4 ply) only 1/8" (0.3175cm) of blade should be seen. To adjust, find the screw head recessed below the bottom of the surface of the cutting head near where the blade is coming out.
3. Turning the screw to the right (clockwise) will decrease the blade depth, the left (counterclockwise) will increase the blade depth. Not all matboard requires 1/8" (0.3175cm). Thicker matboard will require more. Always have the blade depth set so that the backing sheet is scored only slightly. This test and adjustment needs to be done periodically as mat board has many variances of thickness and the depth can increase itself over time with regular use.
4. Another way to test your blade depth is to examine your backing sheet after making a cut. The blade tip should just score into the top of the backing sheet. Cutting even half way through the backing sheet is entirely too much blade.