CUTTING A SINGLE MAT
Cutting a single mat is a three-step process. First, set your measurements. Second, mark out your mat. Third, cut.
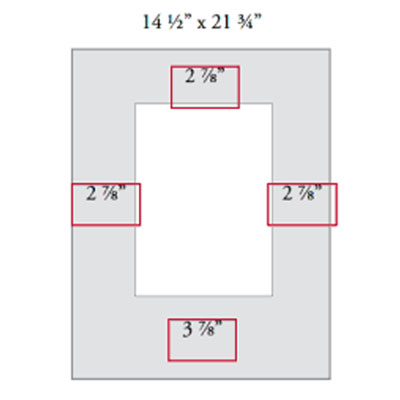
At this stage you have already reduced your matboard from the full size sheet and are ready to cut a window in it. Refer to the notes you made earlier, during the design process, for the measurements of the borders you will cut. It's interesting to note that in mat cutting you don't measure and mark out the window of the mat; rather, you measure and mark out the borders that surround the window, and you use the mat guide to do that measuring.
Step One: The mat guide is the narrow metal bar situated in the angled channels beside the guide rail. By loosening the knobs you can slide the mat guide back and forth in the channels and it will always remain parallel to the guide rail. Beneath the mat guide you will find a scale in 1/16th inch increments. Align the mat guide with the size border you want.
Note: Your mat cutter comes with a backing sheet. This is the long, narrow piece of matboard that lies on the cutting bed under the guide rail. Whenever you cut a window, you should use the backing sheet underneath the mat you are cutting. After a while your backing sheet will become well scored and you should replace it. You may use any piece of scrap matboard for this. During sizing, you should remove the backing sheet. It is only for use when cutting a window in a mat.
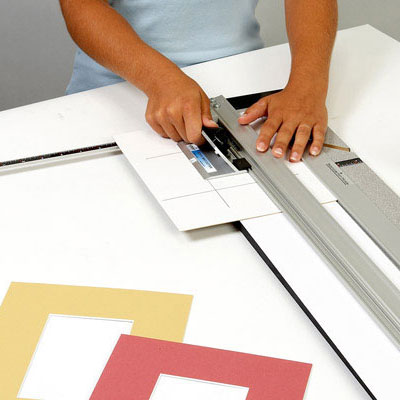
Step Two : Mark out your mat. Stand at the end of the mat cutter. Lift the guide rail and place the mat face down on the bed of the mat cutter and on top of the backing sheet. If your mat cutter has a squaring arm or squaring bar, bring the bottom edge of the mat into contact with it. Then move the left edge to the left until it rests firmly against the mat guide. Lower the guide rail.
Using a sharpened pencil, mark a line along the outside edge of the guide rail. Mark the full length of the back of the mat
If you are cutting a mat with all four borders the same, turn the mat a quarter turn, replace it under the guide rail with the left edge firmly against the mat guide and mark again. Keep turning the mat and marking until all four borders are marked. If you are cutting a mat with a wider bottom border, mark the first three borders, then readjust the mat guide for the bottom border and mark it.
Step Three: Leave the mat in position and put the bevel cutting head onto the of each cutting head will hook easily over the outer lip of the guide rail. After the cutting head is hooked on, the base of the cutting head should glide along smoothly over the back of the mat.
Locate the start and stop indicator line on the back of the cutting head. Move the cutting head along the guide rail and align the start/stop indicator line with the correct intersecting pencil line. Which pencil line is correct depends on the model of mat cutter you're using. The Model #750 Simplex Plus Mat Cutter and the Model #450 Intermediate Mat Cutter are operated by pulling toward you as you cut. With these mat cutters, you cut from the top pencil line to the bottom pencil line. The Model 301-S Logan Compact Mat Cutter is operated by pushing away from you, so you cut from the bottom pencil line to the top pencil line.
Step Four: Lower the blade. The depth of the cut has been pre-set by the manufacturer to penetrate standard thickness matboard, so you cannot cut too deeply; you can only fail to cut deeply enough. Exert adequate pressure to penetrate the mat. Note: Every Logan mat cutter comes with an adjustable blade depth. On most models this takes the form of a small screw in the base that can be turned in or out to adjust the degree of penetration. Proper blade depth is crucial to getting good quality cuts and must be readjusted when switching to different thicknesses of matboard.
Step Five: Cut the mat. Apply firm downward pressure on the cutting head as you cut. Stop your cut when the start/stop indicator line aligns with the opposite intersecting pencil line. Retract The blade from the mat. Remove the cutting head from the guide rail.
Step Six: Lift the guide rail. Turn the mat and replace it on the cutting bed on top of the backing sheet. Bring the left edge firmly against the mat guide and the bottom edge firmly against the squaring arm or squaring bar. Lower the guide rail. Hook the cutting head onto the guide rail. Repeat the cutting procedure. If you are cutting a wider bottom border, you will need to readjust your mat guide after the first cut and reset it to the proper measurement for the remaining borders. When you are finished cutting, the drop-out piece will fall away, revealing the window of your mat.
Note: It is advisable to check your progress as you go. By pressing from the back of the mat, you should be able to see that you've cut completely through. After you've made two cuts, one corner of the window should be free. After you've made three cuts, the drop-out piece should open like a door. After you've made all four cuts, the drop-out piece should fall cleanly from the window. If it doesn't, it means you've undercut and you should go back and re-cut—always starting at the beginning and cutting the full length of the cut again. Cut a little bit farther and get the drop-out piece to fall away cleanly, even if it means getting a slight overcut.
Don't be disappointed if your first mat is not perfect. It takes a few tries to become proficient at mat cutting. Even professional framers who have been cutting for years still have trouble from time to time. That's because mat cutting is a skill. It doesn't happen automatically as soon as you buy a mat cutter. To become adept at mat cutting you must anticipate common problems, understand why they occur and know what to do when they occur. A competent framer is a knowledgeable framer.


