Fitting involves assembling and cleaning all of the items that will go into the frame, installing the entire package in the frame, and finishing the back, typically with a dust cover and hanging hardware.
During this process, it is important to avoid using too much pressure, which could cause buckling of the artwork, matting, and backing boards in the future.
THE SANDWICH FIT
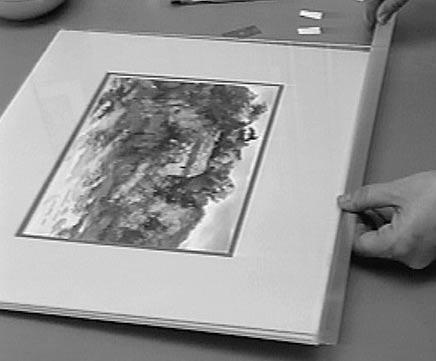
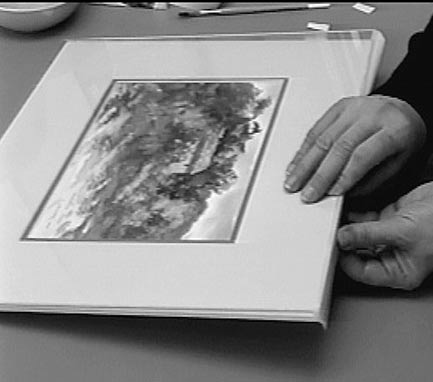
The "sandwich fit" is a very useful fitting technique that keeps all of the materials clean and dust-free during the fitting process, and provides a moisture and pollution barrier for the artwork.
1. Stack the backing board, artwork, mats, and thoroughly cleaned glass face up on the worktable.
2. Using 3/4"-wide Scotch Magic Tape, place a continuous strip of tape along one side of the stack. Attach 1/8" of the tape to the surface of the glass, then wrap the rest around the sides of the stack and attach it to the back side of the backing board.
3. Continue on the other three sides of the stack, creating a u-channel that encases all of the materials in the stack.
A NOTE ON SPACERS
It is generally best to keep the glazing away from the surface of artwork. Matting is the most common spacer, but sometimes a framer does not want a mat on the art.
Other materials, such as narrow balsawood strips or matboard strips, can be used to separate the glazing from the surface of the artwork. After placing the glass or plastic in the frame, glue 1/8" strips of spacer to the inner sides of the frame, resting against the glass. Then proceed with the fitting as described in this section. The spacers will be hidden by the lip of the frame rabbet.
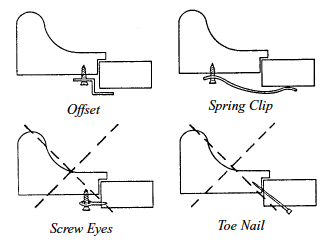
This is the basic procedure for fitting a wood frame. If the wood is very hard, drill holes before inserting nails or screw eyes.
1. Assemble the materials on a clean work surface. For art on paper, this will be glazing, art, matting or spacers, and backing board.
2. Clean the glass. Brush dust and lint off the art, mats, and backing board. Stack the layers in order. If desired, tape together in the sandwich fit method.
3. Place the frame face down. Insert the stack face down in the rabbet of the frame. If the frame is larger than 8" x 10", add an additional "filler" board for support. Use the same material as the backing board.
4. Set a nail on the back with the point against the frame. Tap the nail head with a hammer, guiding it straight into the wood. Do not allow the nail to angle downward, as this places too much pressure on the art and other boards. Install another nail about 2" away from the first; continue all the way around the frame.
5. Apply glue or double-sided tape to the back edges of the frame. Avoid getting glue on the sides of the frame, as it can damage the finish.
6. Place the dust cover paper on the adhesive. Pull and smooth as needed to make the paper taut.
7. Using a single-edged razor blade or a utility knife, trim the paper flush with the edges of the frame. Hold the blade at an angle for a clean cut. Some framers trim the paper about 1/8" from the edge, guiding the blade across the back of the frame with a ruler.
8. Use an awl to poke two holes, one on the left side of the back of the frame, one on the right, to hold the screw eyes. Place the holes about 1/3 of the way down from the top of the frame. Insert the screw eyes, and use the awl to twist them into the frame.
9. Insert one end of the wire into one of the screw eyes. Wrap it around and bring it through the eye a second time. Wrap the excess wire neatly for an inch or two, then cut the rest off. Extend the wire to the other screw eye, allowing some slack—do not pull the wire taut—and repeat the wrapping procedure.