All mat cutters above a certain price point are distinguished by the fact that the bevel cutting head cuts on the left side of the guide rail. All mat cutters below this price point cut on the right side of the guide rail. If your mat cutter cuts on the left side of the guide rail, you are in luck. To cut V-Grooves on it all you have to do is familiarize yourself with the following trim-and-tape method.
Note: The method laid out here is for the Logan Model 650 Framer's Edge Mat Cutter but it can be applied to any mat cutter where the cutting head cuts on the left side of the guide rail.
If you think about it, a V- Groove is really just two facing bevels, so a beveled window is half a V-groove. To get the other half you'll need to trim a reverse bevel on the edges of the window's drop-out piece. You can only do this on mat cutters where the cutting head cuts on the left side of the guide rail.
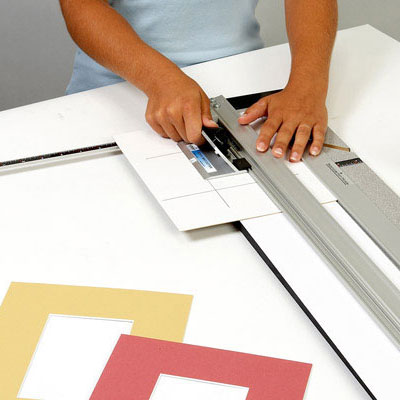
Lower the guide rail of the mat cutter and hold it above the drop-out piece as you loosen the mat guide and adjust it until you have about 1/16" of the drop-out piece exposed along the left edge of the guide rail. Then lower the guide rail.
Insert the blade outside the top edge of the drop-out piece and trim down its length. You are trimming a reverse bevel on the drop-out piece. Trim all four sides. The spacer will provide uniform spacing for each trim.
Turn the mat over and tape on the back using an acid-free masking tape or white artist's tape, which is also acid-free. This tape must be acid-free as it will come into contact with the face of the artwork.
Don't be disappointed that the V-Groove is achieved by taping it together on the back of the mat. The V-Groove in most cases is just an illusion; it only appears to be cut in the surface of the mat.
A more expensive V-Groove accessory can be adjusted to cut in the surface of the mat and give you good mitered corners, but only with a good deal of fussing with the depth adjustment.
Note that most professional framers cut V- Grooves by the method detailed here, which means that most V-Grooves are in fact cut all the way through and taped on the back. This is because most professional framers have mat cutters that cut on the left side of the guide rail. What's more, V-groove cutting is a craft that requires a little patience and skill, the natural domain of the professional framer.
Once you know the trim-and-tape method you can cut perfect V-grooves effortlessly and without a separate V-groove accessory. This method can be employed with the Logan Framer's Edge 650-1 and 660-1, as well as the Logan Platinum Edge 850-1 and 860-1.


