- Why am I getting hooks and curves in my bevel cuts?
- What is a slip sheet and why do I need to use one?
- Why is my bevel cut going the wrong way?
- Why am I getting overcuts in my corners?
- How long will blades last?
- My mat blanks are not coming out square, how do I re-square my squaring arm or squaring bar?
- My borders are tapering from big to small, how do I re-parallel the mat guide?
- I’m left handed so how do I use a mat cutter?
- How do I calculate border sizes to perfectly center the artwork?
- How to cut a reverse bevel
- Getting consistent cuts
- Cutting smaller borders
- How to clean glass for picture framing
Hooks and curves are usually caused by either a dull blade that does not want to cut straight or because the blade depth is too deep. Adjust the blade depth so that you are barely scoring into the surface of the slip sheet underneath. To lean how to adjust you blade depth, find the video for your model of mat cutter and watch how the depth can be adjusted.
A slip sheet is a piece of scrap mat board placed underneath the mat having a bevel opening cut into it. You must always use a slip sheet when bevel cutting but not use a slip sheet when using tho 90 degree straight cutter. A slip sheet forces the blade to cut cleaner when it pushes through from the back side of the mat board. However a straight cut operation cuts from outside edge to outside edge of the material which does not require a slip sheet. Only use scrap mat board as as slip sheet and nothing else.
Getting a reverse direction bevel can be frustrating but its probably improper technique causing the issue. Almost all Logan mat cutting equipment except for the #201 Oval & Circle Cutter always cut from the back of the mat board with the color side down. Make sure you are doing that. Secondly, make sure you are cutting from the proper sides of the lines when bevel cutting. The bulk of the mat board should be to the RIGHT side of the straight edge guiding your cutting head. Or see that the cutting head is always riding on the inside of the 4 border lines you have marked, not the outside of the lines. For more info, see this video:
First off, make sure the unwanted overcuts are on the color side of the mat board as overcuts are necessary on the back side of mats. If cutting line to line, make sure you are starting and stopping on the lines. If you are still getting overcuts, you probably have too much blade depth. Adjust the blade depth so that you are barely scoring into the surface of the slip sheet underneath. To lean how to adjust you blade depth, find the video for your model of mat cutter and watch how the depth can be adjusted.
It will depend on how big the piece of mat board is you are cutting and what type of mat board you are using. Using cotton based rag board or black core mat board is much tougher on a blade and you will need to change more often. Cutting openings in large format mats will also have you going through blades faster. In general, change your blades often. When starting a new project and not remembering when you changed blades last, the first thing is to start with a fresh blade. In general, an 11x14 mat with an 8x10 opening will probably cut 6 to 8 to even 10 openings before needing a change. And remember that most Logan blades are reversible meaning you can flip them around and use the other end.
If you suspect the squaring mechanism on your Logan mat cutter is out of square from the guide rail, first check and verify that using an L shaped carpenter's square placed in the machine along the guide rail and down against the squaring arm or squaring bar. It should fit tight in the corner with no movement. If not, the carpenter’s square should indicate what adjustment is needed to the squaring arm or squaring bar to make it 90 degrees to the guide rail again.
How to re-square the squaring arm:
How to re-square a squaring bar:
If you notice the borders on the mats you are cutting are not even, for example if the mat guide is set at 2" and the border is 2" at one end and 1 7/8" at the other, possible you need to re-parallel the mat guide. Make sure that when you measure the thickness of the borders from one end to the other, you are measuring from the back of the mat from the outside edge to the bottom of the bevel cut. If you need to re-parallel the mat guide, see this video:
True that Logan equipment is designed in general to be used with the right hand. However some left handed users overcome this by either operating the mat cutter from the opposite end pulling instead of pushing or pushing instead of pulling. Here is a video with tips on things to try:
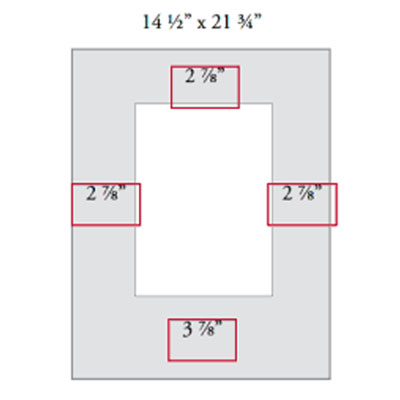
There are many techniques to accomplish this.Watch this video to see a simple method but make sure you always cut the opening slightly smaller when hinge mounting artwork into the mat so the artwork cannot "fall through" the opening.


