Accurate measurements are an important first step in mat cutting. Artwork must be carefully measured to determine the best opening to cut. If the mat will fit into a frame, the frame must be properly measured.
Measuring should be done with a good quality wooden or metal carpenter's rule or artist's rule. Cloth measuring tapes and yardsticks are not accurate enough. A fraction of error could result in buckled artwork, so do not take chances with the ruler.
For framing purposes, frames are measured from the back side of the frame along the inside edge, called the rabbet. The rabbet measurement determines the size of the mats and glass.
Lay the frame face down and use a ruler inside the rabbet to determine the size from end to end for both the width and the height. The rabbet size of the frame, whether ready-made or custom-made, should be slightly larger than the mat, glass and backing. A so-called 8" x 10" frame should actually measure 8 1/8" x 10 1/8" when measured tightly from end to end, inside the rabbet. The mats, backing boards and glass should be cut 8" x 10". This allows a comfortable fit, and leaves a bit of space for expansion as the mats and backing boards react to changes in heat and humidity.
To figure the dimensions of a mat, determine the size of the opening (window) by measuring the artwork to be matted. The mat must overlap each edge of the artwork by at least 1/8" in order to prevent those edges from peeking through (or actually falling through) the mat opening.
Beyond that requirement, the mat opening can improve the presentation of the art. The mat can cover a hole or smudge on one side of a print, or center the people in a photograph. When measuring art for matting, choose an opening that shows what you want, and covers what you don't want.
After the size of the opening is established, add the amount of matting desired.
1. Add the amount of both side borders (left side and right side) to the horizontal opening measurement.
2. Add the amount of both the top and the bottom borders to the vertical opening
It is often helpful to "round up" when dealing with fractions, to create whole numbers which are easier to work with measurement.
For example:
The mat for an 8" x 12" photograph will have an opening of 7 3/4" x 11 3/4" (allowing the mat to cover 1/8" of the photo on every side). The designer has chosen to add a 3" mat border on all four sides, so the outside mat dimensions will be 13 3/4" x 17 3/4".
If 1/8" is added to each border (3 1/8" instead of 3"), the result is a 14" x 18" mat—a convenient standard size—allowing the use of a standard size frame and glass.
The slightly larger mat border will make very little difference in the appearance of the mat, but will make the project much easier to accomplish.
Here are several examples:
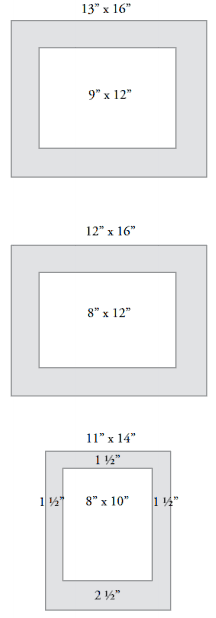
Example ONE:
9" x 12" this represents the mat opening
+ 4" 4" this represents 2" border each side
= 13" x 16" this is the OUTSIDE mat size
Example TWO:
If the frame has already been selected, begin with the frame size and subtract the desired mat opening to determine the border size.
12" x 16" frame size
- 8" x 12" opening size
= 4" 4" 2" border each side
Example THREE:
When matting will not be equal on all sides, either because the artwork does not fit the chosen frame evenly, or because different proportions are preferred for the mat, divide the available border equally, or use extra at the bottom.
11" x 14" frame size - 8" x 10" opening size
- 3" x 4" difference to be divided between the borders
The mat borders will be:
11/2" sides, 2" top and bottom
—or— 11/2" top and sides, 21/2" bottom (as seen in the illustration at right)
Although measurements can sometimes be "rounded up" to allow the convenience of working with whole inches, many mat sizes will not accommodate this. Practice to become familiar with adding, subtracting, and dividing fractions. For example:
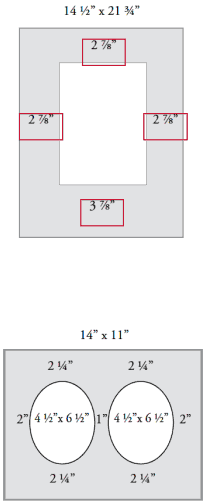
Example FOUR:
An old frame measures 14 1/2" x 21 3/4". The best mat opening for the vertical picture that will be placed in the frame is 8 3/4" x 15".
14 1/2" x 21 3/4" frame size
- 8 3/4" x 15" mat opening
=53/4" 6 3/4 available mat border
It is decided that the mat border will be the same on top and at the sides, with extra at the bottom. Divide the 53/4" in half to determine the side border: there will be 2 7/8" on each side. Since this will also be the top border amount, subtract 2 7/8" from the 6 3/4" available. This leaves 3 7/8", which will be the lower mat border.
Example FIVE:
Two 5" x 7" photos in one mat.
oval openings, each one: 41/2" x 61/2"
top and bottom mat border: 21/4"
side borders: 2"
center space: 1"
Addition:
| Horizontal measurements: | Vertical measurements: |
| 2" | |
| 4 1/2" | |
| 1" | 2-1/4" |
| 4-1/2" | 6-1/2" |
| + 2" | + 2-1/4" |
| = 14" | 11" |
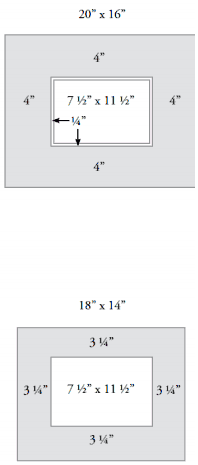
Example SIX:
Double matted 8" x 12" photo.
Frame size: 16" x 20".
Opening: 7 1/2" x 11 1/2"
Note: Example SIX shows a double mat.
A double mat consists of two separate pieces of matboard cut with different mat openings. When attached to one another, the result is a top mat and an undermat (also called a liner mat). See "Cutting a Double Mat" on page 35 for more information about double mats.
16" x 20" frame size
- 7 1/2" x 11 1/2" opening
= - 8 1/2" x 8 1/2"
This allows 4 1/4" border on each side of the mat. 4" will be used for the top mat, and 1/4" will be used for the liner mat.
Example SEVEN:
Single matted 8" x 12" photo.
Frame size: 14" x 18".
14" x 18" frame size
- 7 1/2" x 11 1/2" opening
= 6 1/2" 6 1/2"
This allows a 3 1/4" mat