CUTTING A DOUBLE MAT
A double mat is really just two single mats taped together where the window of the mat on top, or "overmat", is slightly larger than the window of the mat underneath, so that the window of the "undermat" appears as a band of color within the window of the overmat. The obvious approach to cutting such a mat would be to cut two mats of the same size where the window of the overmat is larger than the window of the undermat and tape them together. The problem is, the obvious approach doesn't always work.
If the two mat blanks are even slightly out of square, when you try to line them up you will have trouble getting the perimeter edges to line up simultaneous with the band of color in the window. Professional picture framers avoid this problem by trimming the undermat slightly smaller on its perimeter edges, and having done that, they go even further. They employ a technique that allows them to tape the mats together before they make the second set of cuts, and which insures that they will get perfect alignment every time. Here is that technique:
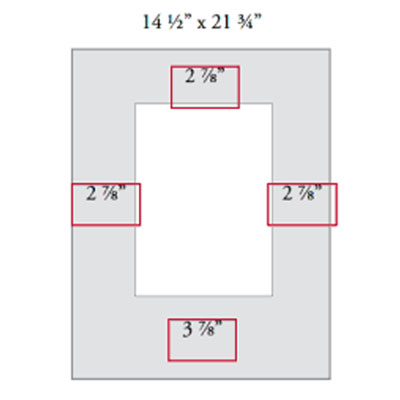
Step One: Cut the window in what will be your overmat. Remember, your overmat will conform to your frame size. Follow the same procedure as you would for cutting a single mat with the following exception: Make the mat borders narrower by the width of the band of color that you want to appear within the window. This band of color is called the "liner" and the finished mat border consists of the overmat plus the liner. Therefore, if your measurements call for mat borders of 2 3⁄4 " and you want to have a standard liner of 1⁄4 ", the border of the overmat will be 2 1⁄2 ". When you add the 1⁄4 " liner, the finished double border will be 2 3⁄4 ".
Step Two: Replace the drop-out piece in the window of the mat you just cut. Lay the dropout piece face down on a flat surface and place the window mat over it. Fit them together like a puzzle (Figure N‑1).
Step Three: Cut the mat blank to be used as the undermat. Be sure to make it marginally smaller on its perimeter edges than the overmat. So, if the overmat is 24"x 31", the undermat should be about 23 1⁄2" x 30 1⁄2", although it doesn't need to be exact.
Step Four: Apply double-sided adhesive transfer tape to the back of the overmat (Figure N‑2). The tape most commonly used for this job is ATG tape. ATG tape is a double-sided adhesive transfer tape that fits into a roller applicator gun called an ATG gun. ATG tape can be applied by hand but it is a lot easier to work with in an applicator gun. ATG tape and an ATG gun can be found at most art supply retailers.
Step Five: Affix the undermat face down to the back of the overmat (Figure N‑3). Since it is smaller than the overmat, you should be able to position it entirely within the perimeter of the overmat.
Step Six: Reset your mat guide in preparation for cutting the borders of the finished double mat. Remember, these are the borders that your original measurements called for.
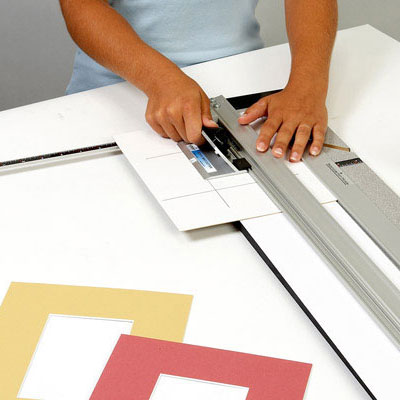
Step Seven: Place your stack of two mats under the guide rail and firmly against the mat guide (Figure N‑4).
Step Eight: Lower the guide rail and cut your double mat following the same procedures as you would for a single mat. The result is a perfectly aligned double mat that is already taped together (Figure N‑5). The same procedure can be taken a step further to create a triple mat.
Figure N-5: Cut the undermat. result is a perfectly aligned double mat.
The single mat and double mat are two of the most fundamental matting techniques. But there are others. Read on to learn other essential matting techniques. For additional hints and tips and free streaming video, visit www.logangraphic.com.


