Determining the Frame Size
The question frequently arises, "How do I know what mat borders will look right with the size window I've got?" To help answer that question, I've devised a table called the Border Finder (Figure C-1). Using the Border Finder, you will select borders that will look appropriate for the size window you've got. However, these may not be the borders you finally settle on. In most cases, given borders you know will look right, you will still want to expand or contract the borders to fit a frame size that works for you. So this becomes a two-step process.
To use the Border Finder you must first express the window size in "united inches". The united inches of a two-dimensional object are the sum of the two dimensions. For example, the united inches of 16"x 20" is 16" + 20". In other words, 36 united inches. The united inches of 8"x 10" is 18 united inches.
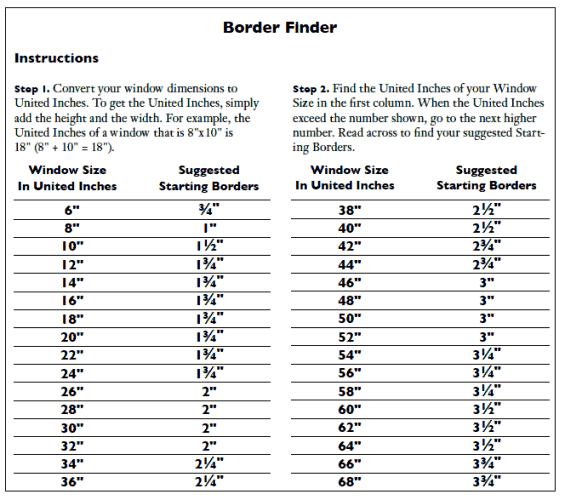
Using the Border Finder, find your sum in the table. (When the united inches falls between two numbers shown, use the higher number.) Then refer to the adjoining column to find appropriate borders for that size window. For example, for a window size of 8"x 10" we find that borders of 1 3⁄4 " will be appropriate. This means four borders each of 1 3⁄4 ". (The question of whether the bottom border should be wider will enter our thinking a little further on.) Adding the mat borders to each dimension of the window gives you the frame size. So, for example, adding two mat borders of 1 3⁄4 " to each dimension of an 8"x 10" window gives you a frame size of 11 1⁄2 " x 13 1⁄2 ". Since it is always easier to work in whole inches rather than fractions, you will probably want to expand the mat borders a little to attain a whole-inch frame size. By adding a quarter inch to each mat border, you will add a half inch to the mat perimeter size, as well as to the frame size. Given our window size of 8"x 10", four borders of 2" will bring us to a frame size of 12"x 14".
Ah, but what if we want a wider bottom border?
The rationale for a wider bottom border goes back to the nineteenth century when the style of hanging artwork was to hang it above eye level and have it pitch outward from the wall on a long wire so that viewing it required looking up from an angle. The wider bottom border was used to offset the illusion of imbalance inherent in this short-lived style of display, but the wider bottom border remains with us today because of its usefulness in making non-proportional art fit standard frames. When the framer is obliged to use a predetermined frame size, as is the case when using frames made in standard sizes, using a wider bottom border helps to fit the frame (Figure C-2).
In our example, we have an 8"x 10" image surrounded by four borders of 2" which brings us to a frame size of 12"x 14"—but the closest standard frame size to that is 11"x 14". If we want to fit an 11"x 14" frame, the side borders will each have to be a half inch narrower (1 1⁄2 "). The top border can be made slightly wider at 13⁄4 ", which will allow for the bottom border to be noticeably wider (2 1⁄4 "). This "weighted border" effect is best used with compositions that benefit from sitting down in the frame or having a foundation or base. Landscapes are particularly well suited for wider bottom borders, as are portraits and other artwork with a distinct horizon.
But what if we prefer all four borders the same? By being able to make our own frames, we will not be forced into using a wider bottom border when we don't really want one. By being able to make our own frames, we can make all four borders the same because we can make the frame any size we want it.