When it comes to measuring for mat cutting and picture framing you can make it easy or difficult. Unfortunately, many beginning framers make it more difficult than it needs to be by making the mistake of buying the frame first.
Since the size of your artwork is non-negotiable, locking yourself into a frame size before you start is like painting yourself into a corner. A better approach is to work from the artwork size outward, adding measurements until you arrive at the frame size. Doing so insures that your measuring involves simple arithmetic.
Here are the measurements you will need to know: the mat's window size, the mat's borders, the overall mat size, the size of the glass and the backing, and the size of the frame. This is not as demanding as it may seem because the "frame size" is not the frame measured from edge to edge. Rather it is considered to be the recess at the back of the frame, what's called the "rabbet" of the frame, the part that contains the components that load into it.
In the same way that a shoe is the same size as the foot that fits into it, the framing components (the mat, the glass and the backing) are the same size as the frame. Once you've determined the overall size of any one of the components, you've discovered the frame size.
Start by determining the size of the mat's window. This will be affected by how you choose to present the artwork in the window of the mat. You usually have three choices. You could show only the image in the window of the mat. You could show the image and some of the border area surrounding the image (assuming a blank area surrounds the image). Or you could show the paper complete; ie, show the edges of the paper.
If you choose to show only the image or if the image bleeds to the edges of the paper, the customary approach is to allow the edges of the mat's window to overlap the edges of the image by 1/4" on each side. Since there are two sides to each dimension (one on either side of the width and one on either side of the height) the window can be determined by subtracting a half inch from the height and width of the image.
When you are measuring to include a blank area surrounding the image it's a simple matter of measuring out the area of the image and its surrounding border that you wish to show in the window of the mat.
If you want to show the paper complete, measure the paper and the amount of additional space surrounding the paper; ie, the distance between the edges of the paper and the edges of the mat's window, and this will be your mat's window size.
Once you've determined the size of the window, the next step is to determine the size of the borders that surround it. You can use the table called the Border Finder to simplify the process.
To use the Border Finder, add the height and width of the window to get the united inches of the window. For example, if your window was 10"x13", the united inches would be 23".
Find the range into which that size falls. For example, 23" falls into the range of 18" - 24". And then read over to the adjoining column to find the appropriate border for that size. In this case, 13/4".
If you prefer to have wider borders, that's okay. But you should not have borders narrower than those called for in the Border Finder.
The question of whether your mat should have a wider bottom border is an aesthetic one. (See the post here that addresses this in some detail). One rule of thumb is that compositions with distinct horizon lines are enhanced by wider bottom borders while those without are better presented in mats where all four borders are the same.
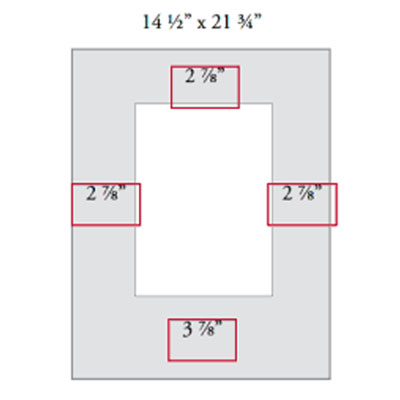
If you wish to have a wider bottom border, you can add it to your measurements. For example, you might have three borders of 13/4" and a bottom border of 23/4".
A mat is nothing more than a window and four borders. So once you've determined these measurements you can add them together to determine your overall mat size, which, by the way, will also be the size of the glass and backing board and, most importantly, the frame size.
Write down the measurements as shown in Figure 1. This way you can see all the measurements and what they refer to. Measurements written down in this way are easy to follow. Keep in mind that these measurements will act as the instructions that you'll refer to when you are cutting the mat or building the picture frame, so they need to be clear.
By working from the artwork size outward to the frame size, the math involved is simple arithmetic. We will deal with the more complicated issue of making the artwork fit into an existing frame in a future post. Whenever possible, however, you will want to leave the question of the frame size an open question until the end. Think of the frame size as the sum of the equation you are working on. Doing so will make measuring for picture framing as easy as it can be.


